Hiển thị các bài đăng có nhãn necklace. Hiển thị tất cả bài đăng

Chủ Nhật, 5 tháng 2, 2012

Crocheted jewelry: Rose collar necklace tutorial


Crocheted jewelry: Rose collar necklace tutorial
Free crochet patterns and tutorial,
Find free crochet jewelry patterns including necklaces, bracelets, chains...

2. 

3. 

4.

Thứ Năm, 1 tháng 12, 2011

Happy newyear 2012: Beaded dragon pendants


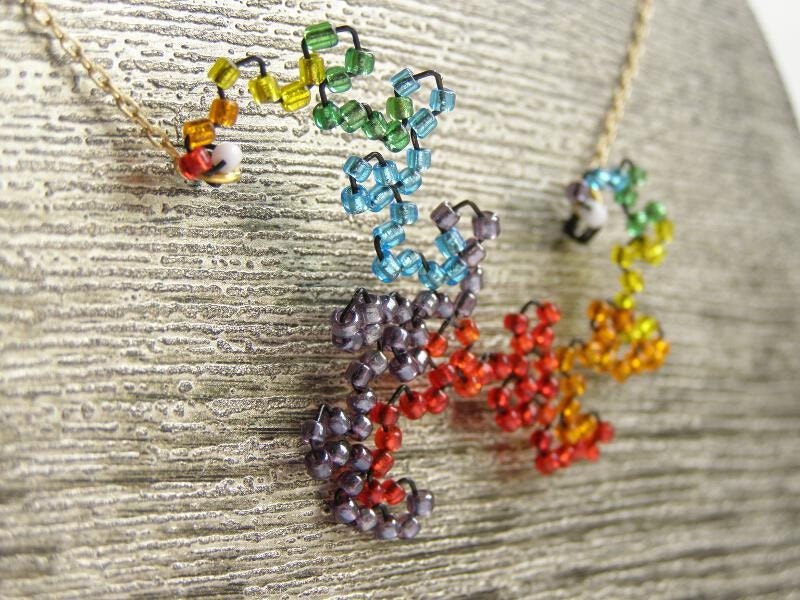
Beaded Dragon Curve Fractal Necklace - Rainbow
From DragonNerd
Beaded Dragon Curve Fractal Necklace - Rainbow


Simple Fractal Beauty. The only pattern in the Dragon Curve is a single 90 degree bend. Then you copy the entire pattern. Then you copy it again, and again, and again... Simplicity itself, but a wondrously complex image comes from it. A beautiful demonstration that something simple can easily become joyfully complex.

This necklace is perfect for both your inner math geek or your extrovert fashionista.Glass Beaded Dragon Phone/Key/Purse Charm
From fiberaddicts
Glass Beaded Dragon Phone/Key/Purse Charm
Beaded Dragon
From lineofbirds
Beaded Dragon


Measuring 4" nose-tail, 2.75" wing-wing, these diminutive dragons are sure to win your heart.
Created with silvered enameled copper wire skeletons, and 8° seed bead flesh, (with smaller bead details), they are charmingly poseable.
Hang one in your window to melt the last of winter's frosty chill, or from your rear view mirror to fly along on a road trip. They have a great sense of direction, and know how to read a GPS. Mine love to perch atop my computer monitor, ready to swoop down onto my keyboard, startling me out of my daydreams.
They are also great garden helpers, each one consuming it's weight in aphids each day from your roses, providing the fuel they need to scorch other scary or harmful garden pests, without harm to your plants, unless you are in the habit of using flammable pesticides. They've even been known to singe the hair from unsuspecting rodents, sending them fleeing-naked and ashamed into the wilds.*

Each dragon is lovingly created according to your request, so allow 10 business days to maturity. Shipping times vary depending on your location, but may take up to 14 days, and even longer near the holidays. Please note me if you plan to order more than one, so that I can give you a time estimate - I am the sole employee.

Chủ Nhật, 13 tháng 11, 2011

Crafty jewelry: Granny Square Necklace tutorial

 
Crafty jewelry: Granny Square Necklace tutorial


I love that shop...
And so I decided to create a granny square necklace in black and white.

Materials Needed:
White and black crochet thread [size 3]
Crochet needle [size G]
Scissors
Hot glue
Necklace chain


crochet 5 squares with crochet thread - 3 black ones, and 2 white ones.


Line the squares into a "V" shape, and tie the corners of the squares together to secure them:


Flip the "V" upside down, and hot glue a chain to the back:


Pair with your favorite black and white blouse:


Source: http://www.mandipidy.com/2011/03/yarn-it-all-tutorial-10-granny-square.html

Thứ Ba, 11 tháng 10, 2011

Crafty jewelry: Ribbon Pearl Necklace tutorial

Anywho, I found my next project on Pintrest.  It was originally linked back to a store but it is no longer available at that store.  So because I had to figure out how to make it myself without a tutorial I am listing this as an Idea Origianl but I was definitely inspired and didn't come up with it all by myself.

Crafty jewelry: Ribbon Pearl Necklace tutorial
Isn't she pretty?  And it is really much easier to make then it looks.
 
Here are the supplies that you will need:
Pearls (I bought 3 packages but only ended up using one for each necklace)
Ribbon
Thread
Needle
 
 
Start out with two strands of Ribbon. Each strand I used measured about 2.5 - 3 feet because I wanted to make sure I had enough.  With the two pieces together tie a knot about 5-6 inches in from one end.  Then tie the thread into that knot.  The thread is what is going to go into the beads, not the ribbon.  When you very first start it will look awkward but it gets better I promise.  So the key is for each ribbon to pass over 2 beads but you want them to alternate so there is ribbon between each bead.  Thread one bead then pull the needle & thread through ribbon A, put on another bead and put the needle and thread through the ribbon B and just keep alternating making sure not to twist the ribbon.  So now that you are confused know exactly what I am talking about let me show you the pictures and that should help a lot.


I used one package of pearls per necklace.  After I threaded the last pearl I again put the 2 ribbon strands together and tied a knot tight against that last pearl.  Trim Ribbon B close to the knot so you are left with only Ribbon A.  Make sure you trim Ribbon B off of the starting end as well so you have 2 single ribbon ends to tie together.  Then with the two ends I decided how long I wanted my necklace to be, tied another knot and trimmed the loose ends.
 
 
I made 2, a purple and a black and I love them both have worn them many times.


Take it from

Thứ Hai, 10 tháng 10, 2011

Halloween jewelry: Candy Corn pendants tutorial

IMG_0953  
Halloween jewelry: Candy Corn earing tutorial
how to make some inexpensive Halloween jewelry with some unexpected materials.
IMG_0894
Supplies:
White, Orange and Yellow Paint Samples
Mod Podge Dimensional Magic
Scissors
Glue
Wax paper to cover surface
Jump rings
Earrings wires
Jeweler’s pliers or needle nose pliers

1.  Gather orange, yellow and white paint samples from your nearest hardware store.

IMG_0877
2.  Cut strips of each color making the orange strip wider than the yellow and the white.

IMG_0879
3.  Take the strips of paper and glue them down to another paint chip making sure that you glue them down on the wrong side of the paint chip.  Sandwich them between two books and weight them down so you get a nice seal.

IMG_0889
4.  When they are all dry cut out a shape of a candy corn.  Don’t worry about perfection.  Imperfection means added whimsy!
IMG_0881
IMG_0882

5.  Take some Mod Podge Dimensional Magic and starting on the outside edge and working your way to the middle put a nice thick coat on your paint chips.

View mp
View Full Album

6.  Let it dry overnight.  Flip it over and add the Dimensional Magic to the other side and wait for that to dry.
7.  After your piece is fully dry it will have a beautifully thick and shiny gloss coat over it.

IMG_0847
IMG_0848
8.  To make the edges smooth rub the sides onto a fine grit sanding sponge  That will make everything look neat.

IMG_0849
9.  Next using the smallest bit you can find drill a hole SLOWLY through the top of your candy corn.

IMG_0850
IMG_0851
10.  Using jeweler’s pliers or needle nose pliers add a jump ring and earring wires and/or a jump ring and a necklace chain.
IMG_0894
IMG_0895
IMG_0952
IMG_0953

Thứ Sáu, 16 tháng 9, 2011

Crafty jewelry: Chevron Duct Tape Bracelet tutoriales


Chevron Bracelet and Geo Necklace
I made this duct tape bracelet as a sample for the craft party and didn’t  get a chance to demo how to make the chevrons. Here are full instructions on how to make the bracelet.  Making the necklace is similar just fold several triangles and attach with jump rings using the instructions below.
Materials for duct tape jewelry


Materials:
Duct Tape
Cutting Mat
Xacto Knife
Jump Rings
Leather punch
Jewelry pliers
Measuring Tape
Stretch several inches of tape facedown on a cutting mat
Stretch tape face down
Cut the width of the tape slightly less than 2 in. so that you have a square.
Cut ~2inches
Use knife to carefully lift square
Use knife to lift
Stack first square onto stretched tape to double up tape (this adds strength and weight) to the chevron
Double up tape
Press down and smooth tape and then cut second second layer of tape
Cut 2nd layer of tape
Carefully lift doubled tape square and place it face up
Place square sticky side up
Fold top two corners of square in like you are making a paper airplane
(this might take a few tries)
Fold top two corners in
Cut the sticky part of the tape from the center where tape meets to the bottom
Cut sticky part in center
Fold the cut pieces from the center bottom to the top left
Fold split piecesFold center split upwards
Then fold the right side and you will have a chevron
Chevron
Trim any overlap from the fold
Trim fold if it overlaps
Repeat to make 3 chevrons
Use a leather punch, set to the smallest hole size, to make 6 holes in each chevron
Use a leather punch to make holesYou may have to twist the hole punch (while holding the duct tape still) to make a good punch
Make 6 holes in each chevronMake 6 holes in each chevron at the tops, bottoms and centers
Attach chevrons together using jump rings.
Open jump ring with jewelry pliersSpread jump rings open with jewelry pliers pulling one end toward you and the other away, rather than opening apart which will ruin the ring
Loop in duct tape and close jump ring by pushing open ends back together
Close jump ring
Here’s a photo of the chevrons after they have been attached, leave the ends to attach bands
Attached Chevrons
To make the bands for bracelet.  Stretch and cut duct tape to 5 in.
Stretch and cut duct tape to make bands
Cut duct tape in half lengthwise (appx. 7/8 of an inch)
Cut duct tape in center lengthwise
Then stretch and cut another piece to 6 inches and cut in half length wise.
You will need 2 six-inch pieces and  1 five-inch piece
Cut 2 six inch pieces and 1 five inch pieice
Carefully lift one piece and place face up, then fold in appx. 1/3 of the width
Fold tape in 1/3 of the width
Then fold once more, turning sticky portion down
Do this for all 3 straps
Fold sticky part down to make band
Punch holes in both ends of all 3 strap pieces
Punch holes in both ends of each strap piece
Attach strap pieces to end of chevron chain using jump rings
Attach straps to chevron chain with jump ringsMake sure to put short strap in the middle
Attach center strap to center piece of chevron on the other end of chevron chain.
Then cross two outer pieces attach to the other end of chevron chain with jump rings.
Cross outer straps but not center strap
To get the bracelet on, work it on carefully. It will still be pretty loose. I tried different ways of making a clasp but I didn’t like the look. So, I decided it was better to have it be a little loose.
Bracelet frontBracelet back

Labels

Accessories afghan Amigurumi amirugumi Áo thun Burberry Art baby crochet baby knitting Baby learn bag Bags balloons Bead belts bemutatkozik bokalánc books booties bows boxes bracelet cách đan áo len cách đan khăn len cách móc nón len cake candles candy Cards carving carving fruit carving fruits clay coloring crafts crochet crochet pattern cross stitch Curtain cutting paper Dolls drawing dress earring Easy dot Ebook đồ dùng em bé Ebook thời trang người lớn ékszertartó elkelt Embroidery Embroidery - Thêu fashion Felt Floral arrangements - Cắm và bó hoa flower arrangement flowers crochet Folding paper Folding towels food food decor fotó Free chart đan len Free chart móc len fülbevaló fülgyűrű fülkapocs Funny garden gift Gifts glass gloves gyűrű Hair hair clip hajcsat hajgumi hat hats hetifotó holiday craft holiday crafts home and garden horgolt jewelery jewelry karkötő kézékszer Khác Khăn - Mũ Khung thêu gỗ tốt kirigami kitűző knitting knitting pattern knot könyvjelző macrame Magazine make up making flower making flowers Making flowers - Làm hoa Making toys makramé mẹo đan len mẹo móc len mittens móc áo len móc áo len kiểu đẹp cho nữ móc len trang trí ứng dụng móc thú nhồi bông móc ví - túi len nail Nail art necklace necklaces nguyen tac phoi mau nyaklánc or Origami painting Paper Patchwork pictures pillow Pillows plastic poncho Quilling paper Quilt recycle recycling repair work ribbon ring rings ritakata rugs sáltű scarves sewing shawls shoes and sandals skirt skirts slippers soap socks sweater szett tablecloths tábor Tatting Thêu Thú nhồi bông bằng len Túi điện thoại bằng len tutorial Tutorial video underwear üveg Valentine's day vásár Video video tutorial viking weaving wedding wood