Hiển thị các bài đăng có nhãn recycling. Hiển thị tất cả bài đăng

Thứ Tư, 4 tháng 1, 2012

Recycling ideas: Unique fashion for women

Unique fashion for women
рукодельные шарфы из футболок

туника из футболки
tunic shirts

Under the cut - a lot of ideas on how to beat a similar texture, making of knitted T-shirts or other clothing or scarves:
рукодельные шарфы из футболок Recycling ideas: Unique fashion for women
рукодельные шарфы из футболок
платье из футболки
рукодельные шарфы из футболок 01
рукодельные шарфы из футболок 0
юбка из футболки
Photo: http://www.secondstreet.ru

Thứ Hai, 7 tháng 11, 2011

Recycling plastic bottles: making Christmas tree and bells tutorial

http://farm5.static.flickr.com/4085/5167402616_93ba9d6bab.jpg 
Recycling plastic bottles: making Christmas tree and bells tutorial
http://farm2.static.flickr.com/1427/5167416704_dbf6dc78ea.jpg
 

http://farm5.static.flickr.com/4001/5167416708_3d543a30fa.jpg
http://farm5.static.flickr.com/4085/5167402616_93ba9d6bab.jpghttp://farm2.static.flickr.com/1379/5167402622_92d840bdcf.jpg 
Source: http://www.flickr.com

Thứ Ba, 18 tháng 10, 2011

Recycling ideas: sheep plush out of mitts and gloves


Recycling ideas: sheep plush out of mitts and gloves
So you’re wondering what to do with an unused faux-wool car wash mitt, an old pair of black fleece mitts, and an old pair of black chenille gloves (you’re not alone,  it’s been a confounding daily ponderable for me, too).  Well, with these items, you can make a new friend.


That’s right, I made this lovable little sheep using the above variety of mitts and gloves.  I picked up the car wash mitt from Dollarama a while back, saving it from a life of grimy slavery.  Perhaps my American readers can rescue a similar mitt from the Dollar Tree.  The advantage of living through blistering cold Canadian winters is I have a stash of old mittens and gloves to append to the car wash mitt.

To recreate this little fellow:
1. Sever the thumb off one of the fleece mitts.
2. On the second fleece mitt, cut along the side opposite the thumb.  Stop once you reach the length equal to where the thumb is joined.
3. On that same mitt, cut the cuff.
4. Sew the thumb on the open side of the second mitt (both turned inside out).  Sew the mitt shut.
5. Cut a slit along the middle of the mitt, the length of the car wash mitt cuff.  Turn right side out.
6. Cut together in one piece the index and middle fingers of the chenille gloves (pairs of legs).  On one of the gloves, sever the thumb (tail).
7. Turn the car wash mitt inside out.  Rip small openings in the seams for the legs and the tail.
8. Fill the legs and tail with the remaining unused fingers of the gloves.  Feed through the designated openings and sew onto the open seams of the car mitt.
9. Turn the car wash mitt right side out.  Fill with your choice of material.  I suggest the leftover pieces of mitts and scraps of an old sweater.
10.  Fill the head.  Wrap the opening around the cuff and sew together.  Add eyes.  My own eyes were set on the big googlies.
I know I won’t miss the mitts and gloves, now that I have something else to love.


Thứ Tư, 12 tháng 10, 2011

Recycling paper for kids: Chicka Chicka Boom Boom-ABC Kid’s Craft

 
Recycling paper for kids: Chicka Chicka Boom Boom-ABC Kid’s Craft


I LOVE Children’s books.  I collect them and get excited about buying them just like most ladies feel about shoes.  I never feel guily about buying them either.  One of my favoirte ABC’s children’s books is Chicka Chicka Boom Boom by Bill Martin, Jr. & John Archambault.  I teach preschool and it was our theme for the year.  I can’t think of a more catchy, fun book for kids-they LOVE it!  My own kiddos have it memorized and I love to hear them read it.  This book makes learning the ABC’s fun!

I even have a huge Coconut tree painted on my wall in honor of the book and we add letters to it as we learn each one.
Today I’d love to start a little “Book Nook” if you will.  I would love to share my favorite children’s books with you and fun activities to go with them…so here is the first one and stay tuned for more in the future. 
After you read this story to your little ones, sing the song, and talk about the book…here are a few fun activities to do!
Mini “Chicka Chicka Boom Boom” Trees:
Supplies you will need:
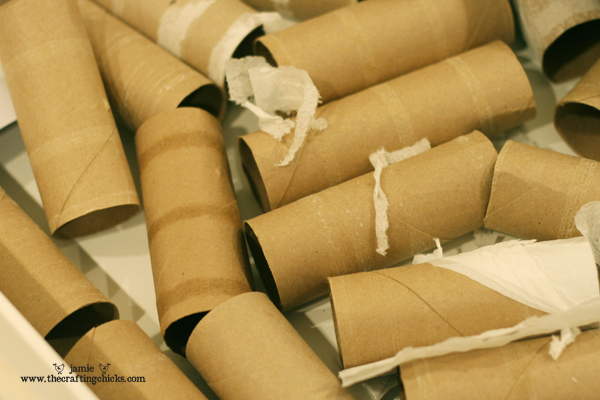
-Toilet Paper Rolls (these are great for so many kid crafts-If you’d like a taller tree, use a paper towel roll:)
-Brown and green cardstock or construction paper
-glue
-Letter stickers or Foam sticker letters
-Scissors
-Palm pattern
To make the mini trees:
First: Cut your brown paper to the length of the toilet paper roll and glue around the roll
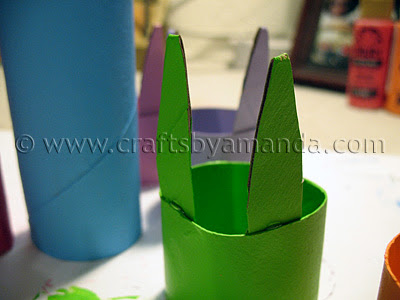
Second:  Cut out the palm tree leaves and glue on the top of the rolls (standing up)  3 per tree.  You may have to help your little one with these steps.
Third:  Add LETTER stickers or foam letter stickers to your tree!  The kids love this part!


Now your kiddo has their very own Chicka Chicka Boom Boom tree to display!
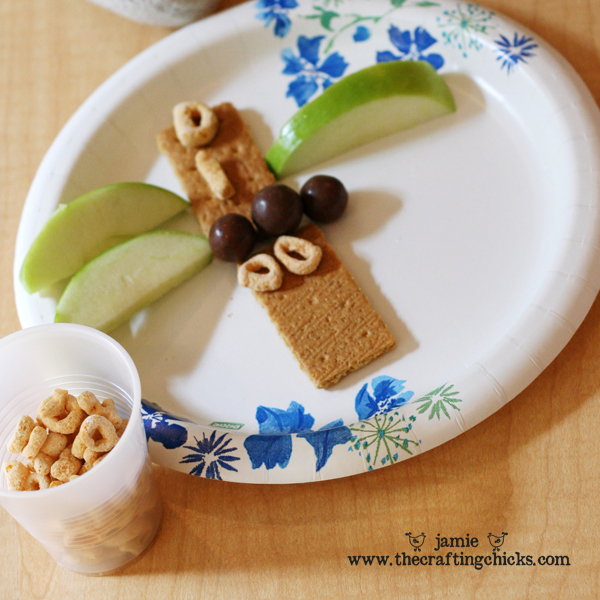
And now for a fun “Chicka Chicka Boom Boom” snack idea to celebrate the book!
What you need:
-Green apple slices for the palms
-Whopper candy for the Coconuts
-Graham Crackers or Chocolate Wafters for the tree trunk
-Alphabit Cereal for the letters
Have your child build their tree and add letters to their “Tasty Tree” like the story did.  They can walk the letters up as you read the story!  Very fun treat idea to celebrate the book!

Thứ Ba, 4 tháng 10, 2011

Recycling paper for kids: Cardboard Tube Bunny Rabbit Family

Ahh bunnies! They’re so cute, and cuddly, and colorful… ? Well, these are anyway! It doesn’t have to be Easter to make some cute bunnies, but their pretty colors remind me of jelly beans! Using cardboard tubes from paper towels or bathroom tissue, you can make this fun and bright family of bunny rabbits with your kids!
Some people are uncomfortable using bathroom tissue rolls, especially those in a day care setting. Paper towel cardboard tubes are the same diameter, just longer, and work equally well. You can simplify your bunnies depending on the age group of your children. To simplify some of these steps, skip the apron on mama bunny and the buttons on daddy, and you can also use pink felt triangles (or construction paper) for the noses. Wiggle eyes will work too instead of marker. I do use a hot glue gun in this project, so please supervise children closely or use a quick drying glue such as Beacon’s instant grab glue.
Cardboard Tube Bunny Rabbit Family
printable version
3 cardboard toilet paper tubes
1 cardboard paper towel tube
7 miniature pink and/or orange pom-poms
felt in various colors for bow ties and hair bows
hot glue gun
black Sharpie marker
scissors
white, orange and green felt for apron (optional)
2 buttons (optional)
Paint (I used the following Folk Art colors, you can use whatever type of acrylic craft paint you prefer):
Pink Melon (dark pink)
Medium Orange (bright orange)
Pink Balloon (light pink)
Medium Blue (bright light blue)
Daffodil Yellow (bright yellow)
Purple Lilac (light purple)
Lime Green (bright light green)
Cut the cardboard tubes as follows. You will end up with 5 baby bodies, 2 adult bodies and 14 ears.
Paper towel tube – Cut a 4.5″ piece for dad, a 4″ piece for mom and five 1/2″ ears.
Toilet tube #1 – Cut two 1.5″ bodies and two 1/2″ ears.
Toilet tube #2 - Cut two 1.5″ bodies and two 1/2″ ears.
Toilet tube #3 – Cut one 1.5″ body and five 1/2″ ears.
Paint each tube, inside and out, and a set of ears to go with each body.
Run a line of hot glue inside the ear and squeeze it closed to flatten it.
Use scissors to trim tops of ears to make them pointy.
Hot glue the ears to the top inside of the cardboard tube body.
Use pink paint to paint a line on each ear.
Glue on mini pom-pom noses and cut bows from felt and attach. For girls, attach bows up by the ears and for boys at the bottom front of the body.
Use Sharpie to add eyes and whiskers.
If you like, cut a simple apron from white felt for the mom. Cut out a small carrot from orange and green felt and glue to the apron. Glue apron in place. Glue 2 buttons to the front of the dad.

Thứ Hai, 26 tháng 9, 2011

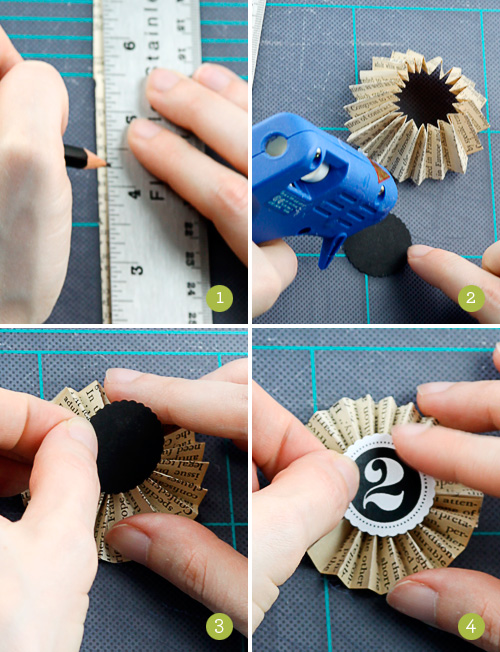
Recycling paper: How to Make Book Page Medallions / Rosettes

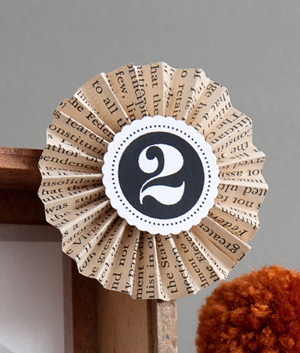
Book Page Medallion Craft

This craft is part of the 13 Days of Halloween project. Download number templates for the project, as well as the bug template for Day 3, in the tips and supplies post. Links to all of the crafts from this project can be found in the main 13 Days of Halloween post.
Medallions, rosettes, accordion fold circles … whatever you call them, they’re a neat detail that you can use as everything from ornaments to gift embellishments. I love the look of old book pages in this craft, but you can use any paper that you’d like. I would recommend a text weight paper, as opposed to cardstock, since it’s easier to bend and fold.
 Recycling paper:  How to Make Book Page Medallions / Rosettes

Book Page Medallions

Supplied Needed
a book page or pages
a ruler
a pencil
a hot glue gun
a 1″ circle or square of cardstock
glue dots or double-sided tape


Instructions
1. Cut a 1″ wide by 11 1/2″ to 12″ long strip from the book page. You may have to use multiple strips, which you can connect together using glue dots or double-sided tape. Lay the strip flat, and using a ruler and pencil, mark the edge of the paper every 1/4″.
2. Fold the paper in an accordion fold, using the pencil marks as your guide. When finished, connect the two loose ends together using glue dots or double-sided tape, forming a circular shape. Add hot glue to a 1″ circle or square of cardstock.
3. Immediately place the piece of cardstock over the center of the back side of the medallion. Hold in place (watch your fngers – that glue is hot!) for 30 seconds or so, until the glue begins to cool and the cardstock is firmly attached.
4. Add the calendar number to the front of the medallion using glue dots or double-sided tape.

Recycling paper for holiday: Awesome Paper Cone Wreath Tutorial

Today I am going to give you a very detailed, step by step tutorial on how to make this wreath.  In fact sorry if it almost feels like paper cone wreath making for dumbies, but I have had a lot of questions about this wreath so I am just trying to cover all my bases.
Recycling paper for holiday: Awesome Paper Cone Wreath Tutorial
Let's get started...

First gather your supplies.


You will want
-5 or 6 double sided scrapbook papers.  I picked 5 different papers from this wreath, but you could do 5 of the same if you wanted.
-Printed pages.  For this wreath I used a book I bought at the dollar store.  But just about any printed pages would work... copy pages... old text book...  whatever.  Just think about the color of the pages before you pick them.  Some pages are whiter than others.
- A 3 inch scalloped paper punch.
-A hot glue gun and about 10 to 15 sticks of glue.
-  A wreath base.


Now lets talk about the wreath base.  Usually I like to get mine from the dollar store, but for some reason they have been out of the 12 inch size wreath lately.  I bought a 9 in base (pictured above) but it just seemed to small and I didn't want to go out to the craft store with all the kids again, so I just made my own.

To make your own you are going to want a newspaper and tape.  Start by laying out the newspaper layers over lapping each other.

Then roll them up making a long tube of newspaper.  Then turn that tube into a lame looking circle and tape the ends together.


Then start wrapping it with more newspaper so it gets a better shape and firmness.


I think most all projects have a "looks really crappy" stage.  This is one of those stages.  Just keep going.  It will all work out in the end.

Alrighty, so now you have a newspaper circle.  Make sure you add enough tape to add strength.
Now lets move on to the paper part of this.  Use the punch to cut out your circles.


You should be able to cut 2 pieces of the thick scrapbook paper at a time.  And don't forget to get those middle punches too.


Don't throw away your paper scraps, you may want them later.
For the book pages you should be able to punch them out 4 pages at a time.  First go through your book and tear pages in sets of 4.  You are going to want a lot of pages.


If for some reason you don't punch out all your circles perfectly, don't worry about it.  You can just roll that spot to the bottom when you make you cones.

Now using your glue gun start making cones.

You will want to make cones of all different widths and try to make sure the cone it closed at the bottom.  They look better on the wreath if they are closed at the bottom.
To make a few that have book page on one side and colored paper on the other, just hot glue them together and the roll them into a cone. 
It is also cute to make a few with off center stacked circles.
I like to make quite a few cones before I start gluing them on.
Start out by working your way around the top of the wreath.
This is another one of the crappy looking stages.
Yes, I like to watch a movie on my laptop while doing this.
Once you get all the way around the top, start filling in the side.  I like to do the middle first.


When I am gluing the cones on top I like to put glue at the base of the cone, but once I am doing the sides I like to put glue on the sides and sometimes on the base.

Once the middle is looking GOOD. I work my way around the outside.

Once you think you got it looking pretty good, look for more spots where you can stick in more cones.  Holding it up to the light can help.
Then make some very skinny cones.
Kinda hold the circle in half-ish and roll it kinda tight so you have a skinny cone.
These cones are great to stick  the middle of other cones.
Then I hot glued circles to the ugly wreath base to make it more pretty.
Then I made the little welcome sign.   I cut them out of s leftover piece of scrapbook paper.
And hot glue them to a string and the glue it to your wreath.
The possibilities are endless.

Labels

Accessories afghan Amigurumi amirugumi Áo thun Burberry Art baby crochet baby knitting Baby learn bag Bags balloons Bead belts bemutatkozik bokalánc books booties bows boxes bracelet cách đan áo len cách đan khăn len cách móc nón len cake candles candy Cards carving carving fruit carving fruits clay coloring crafts crochet crochet pattern cross stitch Curtain cutting paper Dolls drawing dress earring Easy dot Ebook đồ dùng em bé Ebook thời trang người lớn ékszertartó elkelt Embroidery Embroidery - Thêu fashion Felt Floral arrangements - Cắm và bó hoa flower arrangement flowers crochet Folding paper Folding towels food food decor fotó Free chart đan len Free chart móc len fülbevaló fülgyűrű fülkapocs Funny garden gift Gifts glass gloves gyűrű Hair hair clip hajcsat hajgumi hat hats hetifotó holiday craft holiday crafts home and garden horgolt jewelery jewelry karkötő kézékszer Khác Khăn - Mũ Khung thêu gỗ tốt kirigami kitűző knitting knitting pattern knot könyvjelző macrame Magazine make up making flower making flowers Making flowers - Làm hoa Making toys makramé mẹo đan len mẹo móc len mittens móc áo len móc áo len kiểu đẹp cho nữ móc len trang trí ứng dụng móc thú nhồi bông móc ví - túi len nail Nail art necklace necklaces nguyen tac phoi mau nyaklánc or Origami painting Paper Patchwork pictures pillow Pillows plastic poncho Quilling paper Quilt recycle recycling repair work ribbon ring rings ritakata rugs sáltű scarves sewing shawls shoes and sandals skirt skirts slippers soap socks sweater szett tablecloths tábor Tatting Thêu Thú nhồi bông bằng len Túi điện thoại bằng len tutorial Tutorial video underwear üveg Valentine's day vásár Video video tutorial viking weaving wedding wood